一、类和对象
类和对象的关系:⽤类去创建⼀个对象,类是对⼀系列具有相同特征和⾏为的事物的统称,是⼀个抽象的概念,不是真实存在的事物,对象是类创建出来的真实存在的事物
1. 定义类
- 类名要满⾜标识符命名规则,同时遵循⼤驼峰命名习惯
- 语法
1
2
3
4
|
class A():
def test(self):
print('hello world')
|
1、理解self
- self指的是调⽤该函数的对象,打印对象和self得到的结果是⼀致的,都是当前对象的内存中存储地址
1
2
3
4
5
6
7
8
9
10
11
| class TestClass():
def test1(self):
print('hello world')
print(self)
testclass= TestClass()
print(testclass)
testclass.test1()
|
2. 创建对象
1
2
3
4
5
6
|
class A():
def test(self):
print('hello world')
a = A()
|
2、添加和获取对象属性
- 类外⾯添加和获取对象属性,语法:
对象名.属性名 = 值
- 类外面获取对象属性,语法:
对象名.属性名
- 类⾥⾯获取对象属性,语法:
self.属性名
1
2
3
4
5
6
7
8
| class TestClass():
def test1(self):
print(f'hello world {self.attribute1}')
testclass= TestClass()
testclass.attribute1 = 100
testclass.test1()
|
3. 魔法方法
1、**__init__()**
1
2
3
4
5
6
7
8
9
| class TestClass():
def __init__(self):
self.attribute1 = 100
def test1(self):
print(f'hello world {self.attribute1}')
testclass= TestClass()
testclass.test1()
|
- 带参数的
__init__(),作⽤:对不同的对象设置不同的初始化属性
1
2
3
4
5
6
7
8
9
| class TestClass():
def __init__(self,num):
self.attribute1 = num
def test1(self):
print(f'hello world {self.attribute1}')
testclass= TestClass(100)
testclass.test1()
|
2、**__str__()**
- 当使⽤print输出对象的时候,默认打印对象的内存地址;如果类定义了
__str__ ()方法,那么就会打印出在这个方法中 return的数据
1
2
3
4
5
6
7
8
9
| class TestClass():
def __init__(self,num):
self.attribute1 = num
def __str__(self):
return 'hello world'
testclass= TestClass(100)
print(testclass)
|
3、**__del__()**
- 当删除对象时,python解释器也会默认调⽤
__del__() 方法
1
2
3
4
5
6
7
8
9
| class TestClass():
def __init__(self,num):
self.attribute1 = num
def __del__(self):
print(f'{self}对象已被删除')
testclass= TestClass(100)
del testclass
|
4. 类属性和实例属性
(1)类属性
1、设置和访问类属性
- 类属性:类对象所拥有的属性,它被该类的所有实例对象所共有,可以使⽤类对象或实例对象访问
- 优点:类属性为全类所共有,仅占⽤⼀份内存,更加节省内存空间
- 使用场景:记录的某项数据始终保持⼀致时,则定义类属性
1
2
3
4
5
6
7
8
| class A(object):
num= 10
a1= A()
a2= A()
print(A.num)
print(a1.num)
print(a2.num)
|
2、修改类属性
1
2
3
4
5
6
7
8
9
10
11
12
13
14
15
| class A(object):
num = 100
a1 = A()
a2 = A()
A.num= 200
print(a1.num )
print(a2.num )
a1.num= 300
print(a1.num)
print(a2.num)
|
(2)实例属性
1
2
3
4
5
6
7
8
9
10
| class A(object):
def __init__(self):
self.num = 100
def info(self):
print(self.num)
a = A()
print(a.num)
a.info()
|
5. 类方法和静态方法
(1)类方法
- 特点:第⼀个参数必须是类对象,⼀般以
cls作为第⼀个参数,能够通过类对象和实例对象访问
- 使⽤场景:当方法中需要使用类对象(如访问私有类属性等)时,⼀般和类属性配合使用
- 修饰方法:装饰器
@classmethod
1
2
3
4
5
6
7
8
9
10
11
12
13
| class A(object):
__num = 100
@classmethod
def get_num(cls):
return cls.__num
re1 = A.get_num()
print(re1)
a = A()
re2 = a.get_num()
print(re2)
|
(2)静态方法
- 特点:既不需要传递类对象也不需要传递实例对象(形参没有
self/cls),能够通过类对象和实例对象访问
- 使⽤场景:当方法中既不需要使用实例对象,也不需要使用类对象时,取消不需要的参数传递,有利于减少不必要的内存占用和性能消耗
- 修饰方法:装饰器
@staticmethod
1
2
3
4
5
6
7
8
9
| class A(object):
@staticmethod
def info():
print('100')
a = A()
a.info()
A.info()
|
二、面向对象的三大特性
1. 封装
- 封装:将属性和方法书写到类⾥⾯的操作,可以为属性和方法添加私有权限
2. 继承
- 继承指的是多个类之间的所属关系,即子类默认继承⽗类的所有属性和方法,且可以重写⽗类属性和方法
- 在Python中,所有类默认继承object类,object类是顶级类或基类,其他子类叫做派⽣类
1
2
3
4
5
6
7
8
9
10
11
12
|
class A(object):
def __init__(self):
self.num = 100
def info(self):
print(self.num)
class B(A):
pass
b = B()
b.info()
|
(1)单继承
1
2
3
4
5
6
7
8
9
10
11
12
13
14
15
16
17
18
19
20
|
class A(object):
def __init__(self):
self.name= 'Jack'
def info(self):
print(f'姓名:{self.name}')
class B(A):
pass
people = B()
print(people.name)
people.info()
|
(2)多继承
- ⼀个类同时继承多个⽗类,默认使⽤第⼀个⽗类的同名属性和方法
1
2
3
4
5
6
7
8
9
10
11
12
13
14
15
16
17
18
19
20
21
22
23
24
25
26
27
28
|
class A(object):
def __init__(self):
self.name= 'Jack'
def info(self):
print(f'姓名:{self.name}')
class B(object):
def __init__(self):
self.name= 'Tom'
def info(self):
print(f'姓名:{self.name}')
class C(A,B):
pass
people = C()
print(people.name)
people.info()
|
(3)子类重写父类同名方法和属性
- 子类和父类具有同名属性和方法时,默认使用子类的同名属性和方法
1
2
3
4
5
6
7
8
9
10
11
12
13
14
15
16
17
18
19
20
21
22
23
24
25
26
27
28
29
30
31
32
|
class A(object):
def __init__(self):
self.name= 'Jack'
def info(self):
print(f'姓名:{self.name}')
class B(object):
def __init__(self):
self.name= 'Tom'
def info(self):
print(f'姓名:{self.name}')
class C(A,B):
def __init__(self):
self.name= 'Jerry'
def info(self):
print(f'姓名:{self.name}')
people = C()
print(people.name)
people.info()
|
(4)子类调用父类的同名方法和属性
- 为了保证调用到的是父类属性,所以必须在调⽤方法前调⽤父类的初始化
1
2
3
4
5
6
7
8
9
10
11
12
13
14
15
16
17
18
19
20
21
22
23
24
25
26
27
28
29
30
31
32
33
34
35
36
37
38
39
40
41
42
43
44
45
46
|
class A(object):
def __init__(self):
self.name= 'Jack'
def info(self):
print(f'姓名:{self.name}')
class B(object):
def __init__(self):
self.name= 'Tom'
def info(self):
print(f'姓名:{self.name}')
class C(A,B):
def __init__(self):
self.name= 'Jerry'
def info(self):
self.__init__()
print(f'姓名:{self.name}')
def A_info(self):
A.__init__(self)
A.info(self)
def B_info(self):
B.__init__(self)
B.info(self)
people = C()
print(people.name)
people.info()
people.A_info()
people.B_info()
people.info()
|
(5)多层继承
1
2
3
4
5
6
7
8
9
10
11
12
13
14
15
16
17
18
19
20
21
22
23
24
25
26
27
28
29
30
31
32
33
34
35
36
37
38
39
40
41
42
43
44
45
46
47
48
49
|
class A(object):
def __init__(self):
self.name= 'Jack'
def info(self):
print(f'姓名:{self.name}')
class B(object):
def __init__(self):
self.name= 'Tom'
def info(self):
print(f'姓名:{self.name}')
class C(A,B):
def __init__(self):
self.name= 'Jerry'
def info(self):
self.__init__()
print(f'姓名:{self.name}')
def A_info(self):
A.__init__(self)
A.info(self)
def B_info(self):
B.__init__(self)
B.info(self)
class D(C):
pass
people = D()
print(people.name)
people.info()
people.A_info()
people.B_info()
|
(6)super()调⽤⽗类方法
- 使⽤
super()可以⾃动查找⽗类,⽐较适合单继承使⽤
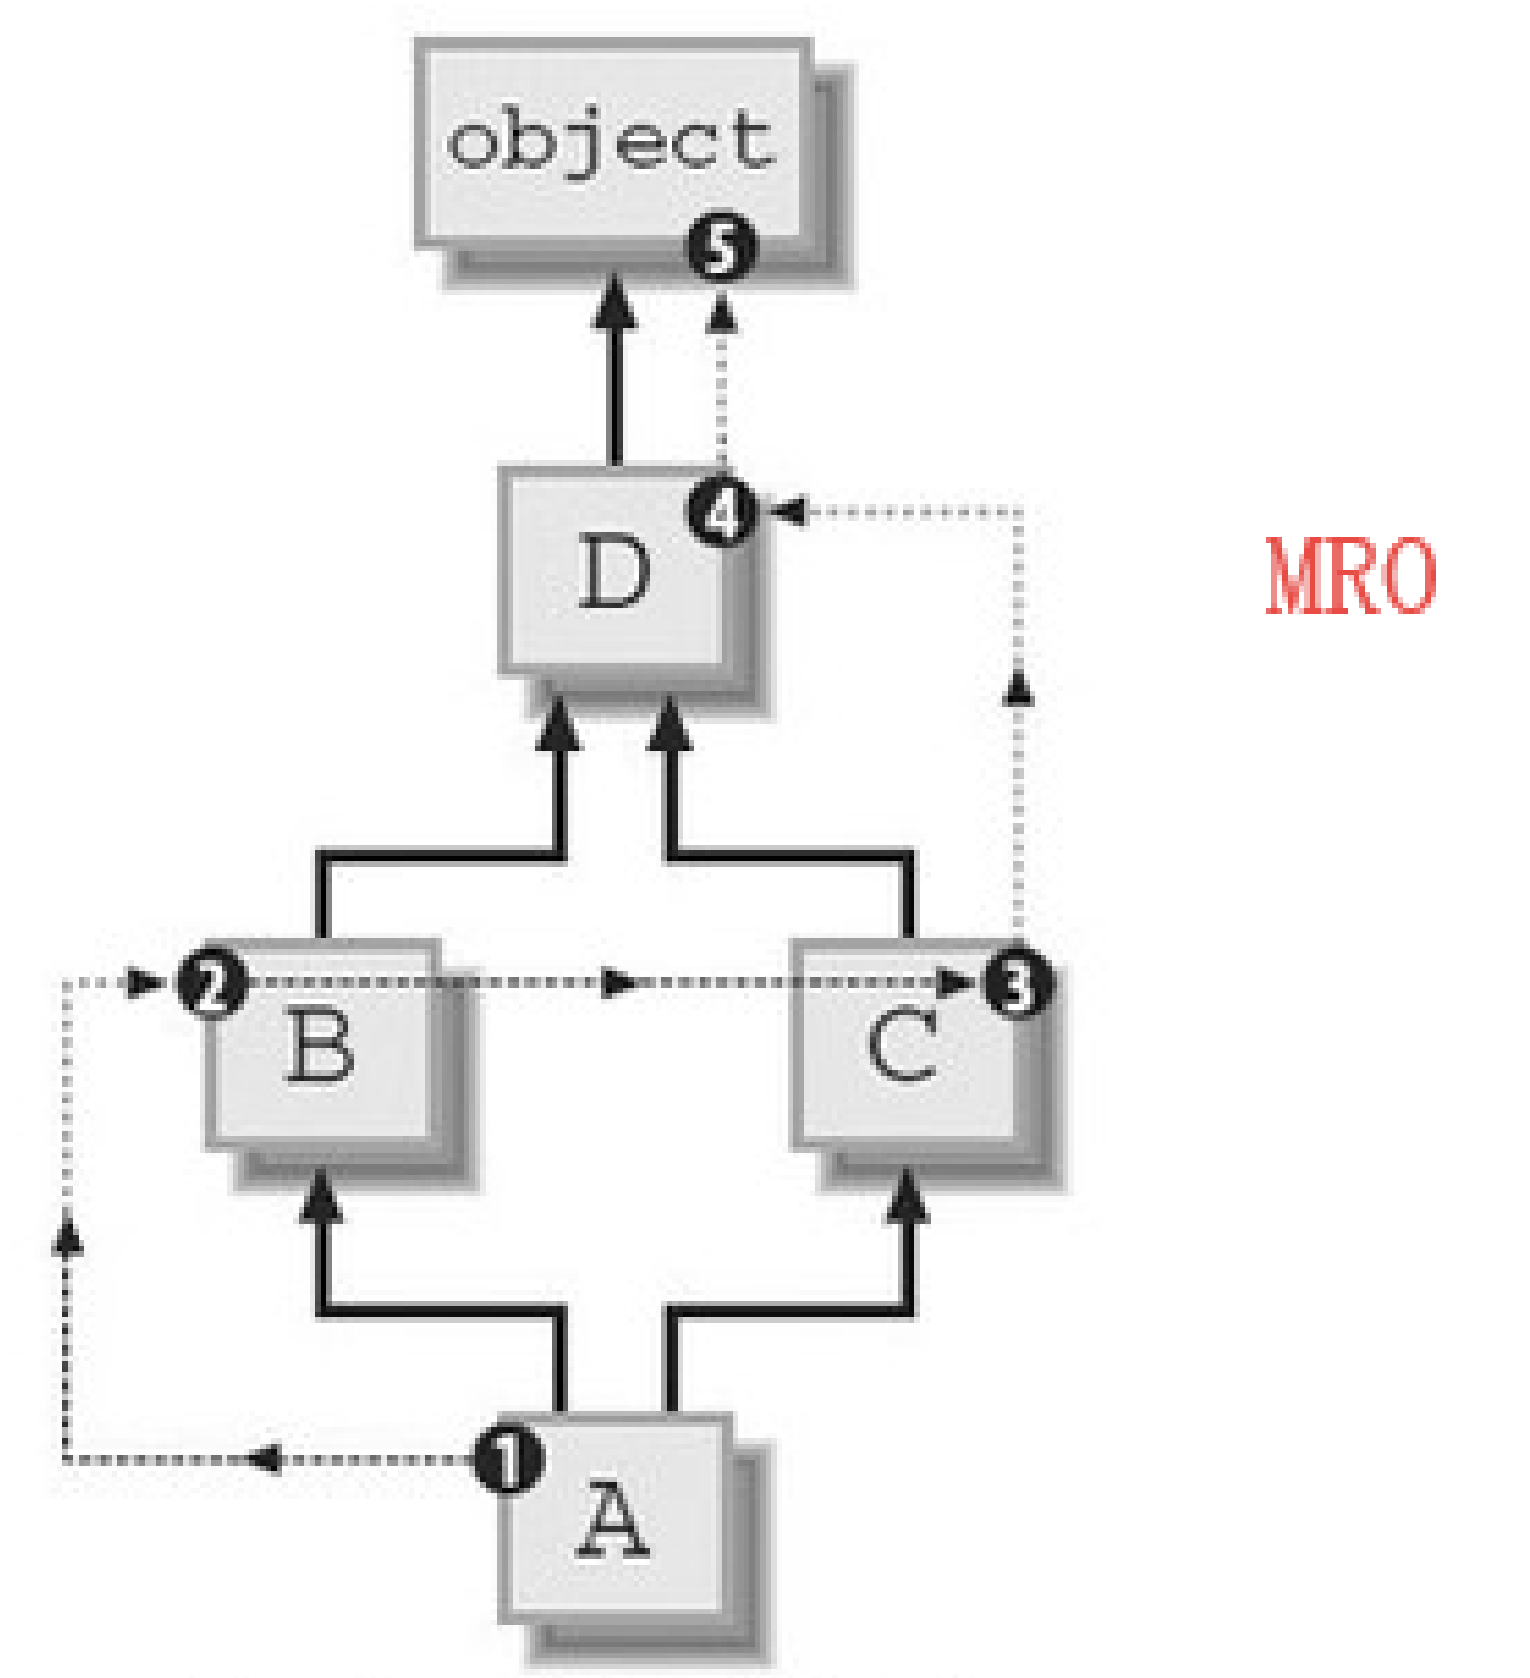
- 遵循MRO继承顺序(虚线)

1
2
3
4
5
6
7
8
9
10
11
12
13
14
15
16
17
18
19
20
21
22
23
24
25
26
27
28
29
30
31
32
33
34
35
36
37
38
39
40
41
42
43
44
45
46
47
48
49
50
51
52
53
54
55
56
57
58
59
60
61
62
63
|
class A(object):
def __init__(self):
self.name= 'Jack'
def info(self):
print(f'姓名:{self.name}')
class B(A):
def __init__(self):
self.name= 'Tom'
def info(self):
print(f'姓名:{self.name}')
super().__init__()
super().info()
class C(B):
def __init__(self):
self.name= 'Jerry'
def info(self):
self.__init__()
print(f'姓名:{self.name}')
def A_info(self):
A.__init__(self)
A.info(self)
def B_info(self):
B.__init__(self)
B.info(self)
def A_B_info(self):
super().__init__()
super().info()
people = C()
print(people.name)
people.info()
people.A_info()
people.B_info()
people.A_B_info()
|
(7)私有权限
1、定义私有属性和方法
- 可以为实例属性和方法设置私有权限,即设置某个实例属性或实例方法不继承给子类(只能在类⾥⾯访问和修改)
- 设置私有权限的方法:定义属性名或方法名时在前面加
__,也就是__属性名、__方法名
1
2
3
4
5
6
7
8
9
10
11
12
13
14
15
16
17
18
19
20
21
22
23
24
25
26
27
28
29
30
31
32
33
34
35
36
37
38
39
40
41
42
43
44
45
46
47
48
49
50
51
52
53
54
55
56
57
58
59
60
61
62
63
|
class A(object):
def __init__(self):
self.name= 'Jack'
def info(self):
print(f'姓名:{self.name}')
class B(object):
def __init__(self):
self.name= 'Tom'
def info(self):
print(f'姓名:{self.name}')
class C(A,B):
def __init__(self):
self.name= 'Jerry'
self.__age = 18
def __info(self):
print(self.name)
print(self.__age)
def info(self):
self.__init__()
print(f'姓名:{self.name}')
def A_info(self):
A.__init__(self)
A.info(self)
def B_info(self):
B.__init__(self)
B.info(self)
class D(C):
pass
people = C()
print(people.name)
people.info()
people = D()
print(people.name)
people.info()
|
2、获取和修改私有属性值
- ⼀般定义函数名get_xx⽤来获取私有属性,定义set_xx⽤来修改私有属性值
1
2
3
4
5
6
7
8
9
10
11
12
13
14
15
16
17
18
19
20
21
22
23
24
25
26
27
28
29
30
31
32
33
34
35
36
37
38
39
40
41
42
43
44
45
46
47
48
49
50
51
52
53
54
55
56
57
|
class A(object):
def __init__(self):
self.name= 'Jack'
def info(self):
print(f'姓名:{self.name}')
class B(object):
def __init__(self):
self.name= 'Tom'
def info(self):
print(f'姓名:{self.name}')
class C(A,B):
def __init__(self):
self.name= 'Jerry'
self.__age = 18
def get_age(self):
return self.__age
def set_age(self):
self.__age = 20
def __info(self):
print(self.name)
print(self.__age)
def info(self):
self.__init__()
print(f'姓名:{self.name}')
def A_info(self):
A.__init__(self)
A.info(self)
def B_info(self):
B.__init__(self)
B.info(self)
class D(C):
pass
people = C()
print(people.get_age())
people.set_age()
print(people.get_age())
|
3. 多态
- 多态是⼀种使⽤对象的⽅式,依赖于继承:⼀个抽象类有多个子类,子类重写⽗类方法,调⽤不同子类对象的相同⽗类方法,可以产⽣不同的执⾏结果
实现步骤:
- 定义⽗类,并提供公共方法
- 定义子类,并重写⽗类方法
- 传递子类对象给调⽤者,可以看到不同子类执⾏效果不同
1
2
3
4
5
6
7
8
9
10
11
12
13
14
15
16
17
18
19
20
21
22
23
24
25
26
|
class Dog(object):
def info(self):
print('我是一只狗')
class Samll_Dog(Dog):
def info(self):
print('我是一只小狗')
class Big_Dog(Dog):
def info(self):
print('我是一只大狗')
class Dog_Type(object):
def dog_info(self, dog):
dog.info()
small_dog = Samll_Dog()
big_dog = Big_Dog()
dog_type = Dog_Type()
dog_type.dog_info(small_dog)
dog_type.dog_info(big_dog)
|
三、异常
1. 了解异常
异常:当检测到⼀个错误时,解释器无法继续执行,出现了⼀些错误的提示
2. 捕获异常的语法
1
2
3
4
5
| try:
可能发⽣错误的代码
except:
如果出现异常执⾏的代码
|
1
2
3
4
5
| try:
可能发⽣错误的代码
except 异常类型:
如果捕获到该异常类型执⾏的代码
|
注意:
- 如果尝试执⾏的代码的异常类型和要捕获的异常类型不⼀致,则⽆法捕获异常
- ⼀般try下⽅只放⼀⾏尝试执⾏的代码
1
2
3
4
5
| try:
可能发⽣错误的代码
except (异常类型1, 异常类型2):
如果出现这些异常执⾏的代码
|
1
2
3
4
5
| try:
可能发⽣错误的代码
except (异常类型1, 异常类型2) as result:
print(result)
|
1
2
3
4
5
6
| try:
可能发⽣错误的代码
except Exception as result:
print(result)
|
1
2
3
4
5
6
7
8
| try:
可能发⽣错误的代码
except Exception as result:
print(result)
else:
print('未发生异常')
|
- 异常的finally:表示⽆论是否异常都要执⾏的代码
1
2
3
4
5
6
7
8
9
10
11
| try:
可能发⽣错误的代码
except Exception as result:
print(result)
else:
print('未发生异常')
finally:
print('发生异常')
|
3. 自定义异常
1
2
3
4
5
6
7
8
9
10
|
class 异常类类名(Exception):
代码
def __str__(self):
return ...
raise 异常类名()
|
1
2
3
4
5
6
7
8
9
10
11
12
13
14
15
16
17
18
19
20
|
class ShortInputError(Exception):
def __init__(self, length, min_len):
self.length = length
self.min_len = min_len
def __str__(self):
return f'你输⼊的⻓度是{self.length}, 不能少于{self.min_len}个字符'
def main():
try:
con = input('请输⼊密码:')
if len(con) < 3:
raise ShortInputError(len(con), 3)
except Exception as result:
print(result)
else:
print('密码已经输⼊完成')
main()
|
四、模块和包
1. 模块
模块(Module):是以 .py 结尾的Python文件,能定义函数、类和变量,也能包含可执行的代码
1、导⼊模块
import 模块名1, 模块名2...from 模块名 import 功能1, 功能2, 功能3...from 模块名 import *import 模块名 as 别名from 模块名 import 功能名 as 别名
2、制作模块
每个Python文件都可以作为⼀个模块,模块的名字就是⽂件的名字(必须符合标识符命名规则)
- 定义模块:新建⼀个Python⽂件,命名为 my_module1.py ,并定义 testA 函数。
- 测试模块:在实际开发中,为了让模块能够在项目中达到想要的效果,一般会在 .py 文件中添加⼀些测试代码
让测试代码在模块被导入的时候不被执行
1
2
| if __name__ == '__main__':
测试代码
|
3、模块定位顺序
导入模块时,Python解析器对模块位置的搜索顺序是:
- 当前⽬录
- 如果不在当前⽬录,则搜索在shell变量PYTHONPATH下的每个⽬录
- 如果都找不到,会查看默认路径
模块搜索路径存储在system模块的sys.path变量中(变量⾥包含当前目录,PYTHONPATH和由安装过程决定的默认默认)
注意
- ⾃⼰的⽂件名不要和已有模块名重复,否则导致模块功能⽆法使⽤
- 使⽤
from 模块名 import 功能的时候,如果功能名字重复,调⽤到的是最后定义或导⼊的功
能
4、**__all__**
如果⼀个模块⽂件中有 __all__ 变量,当使⽤from 模块 import *导⼊时,只能导入 __all__ 列表中的元素
2. 包
包(Package):将有联系的模块组织在⼀起,放到同⼀个⽂件夹下,并且创建⼀个__init__.py ⽂件
1、制作包
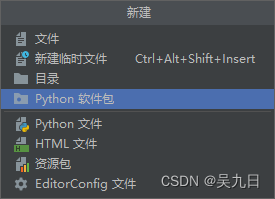
PyChram新建包:文件 — 新建 — Python 软件包 — 输⼊包名 — 新建功能模块(有联系的模块)
注意:新建包后,包内部会⾃动创建 init.py ⽂件,此文件控制着包的导入行为

2、导入包
方法一:
1
2
3
| import 包名.模块名
包名.模块名.⽬标
|
方法⼆:
1
2
3
| from 包名 import *
模块名.目标
|
注意:必须在 init.py ⽂件中添加 __all__ = [] ,控制允许导入的模块列表

